Please note that this is a parody post and not meant to be serious or informative. I didn't want to make another berry recipe and fall produce isn't quite ready yet here, so this is what I have for you this week instead of food instruction. A friend requested this post, so I decided to oblige.
It's always possible to drink your strawberry cordial directly after brewing (which is often very tempting!) but if you want to keep your cordial available and fresh to keep your spirits up in winter, casking is the best option. It ages the cordial nicely and keeps it from spoiling so you can open and enjoy the drink whenever you choose.
The best casks are made of solid oak wood, as they create a nice, deep flavor on their own. Regardless of your choice of wood, however, you must start by making it liquid tight. Fill the cask with water, topping off as necessary until the wood expands enough to stop leaking before emptying the water. At this point, you can either fill the cask directly or season it.
An additional layer of flavor can be added by seasoning the cask first. The most common choice of seasoning in Redwall is maple smoke. Fill the bottom of the cask with fist-sized chunks of smoldering maple. Cover a majority of the top of the cask to concentrate the fire -- don't cover the entire opening or you will smother the fire. After several minutes, carefully remove the cover. The fire will rapidly expand, charring the inside of the cask and leaving behind a strong, smoky flavor.
Once the cask is prepared, fill it with your cordial or other beverage, seal the cask, and place it horizontally into a holder. After a week, open the cask and top off the liquid, which will have absorbed slightly into the wood. It may be necessary to repeat this process once more, but after two weeks your cask of cordial should be ready for storage.
14 September, 2014
06 September, 2014
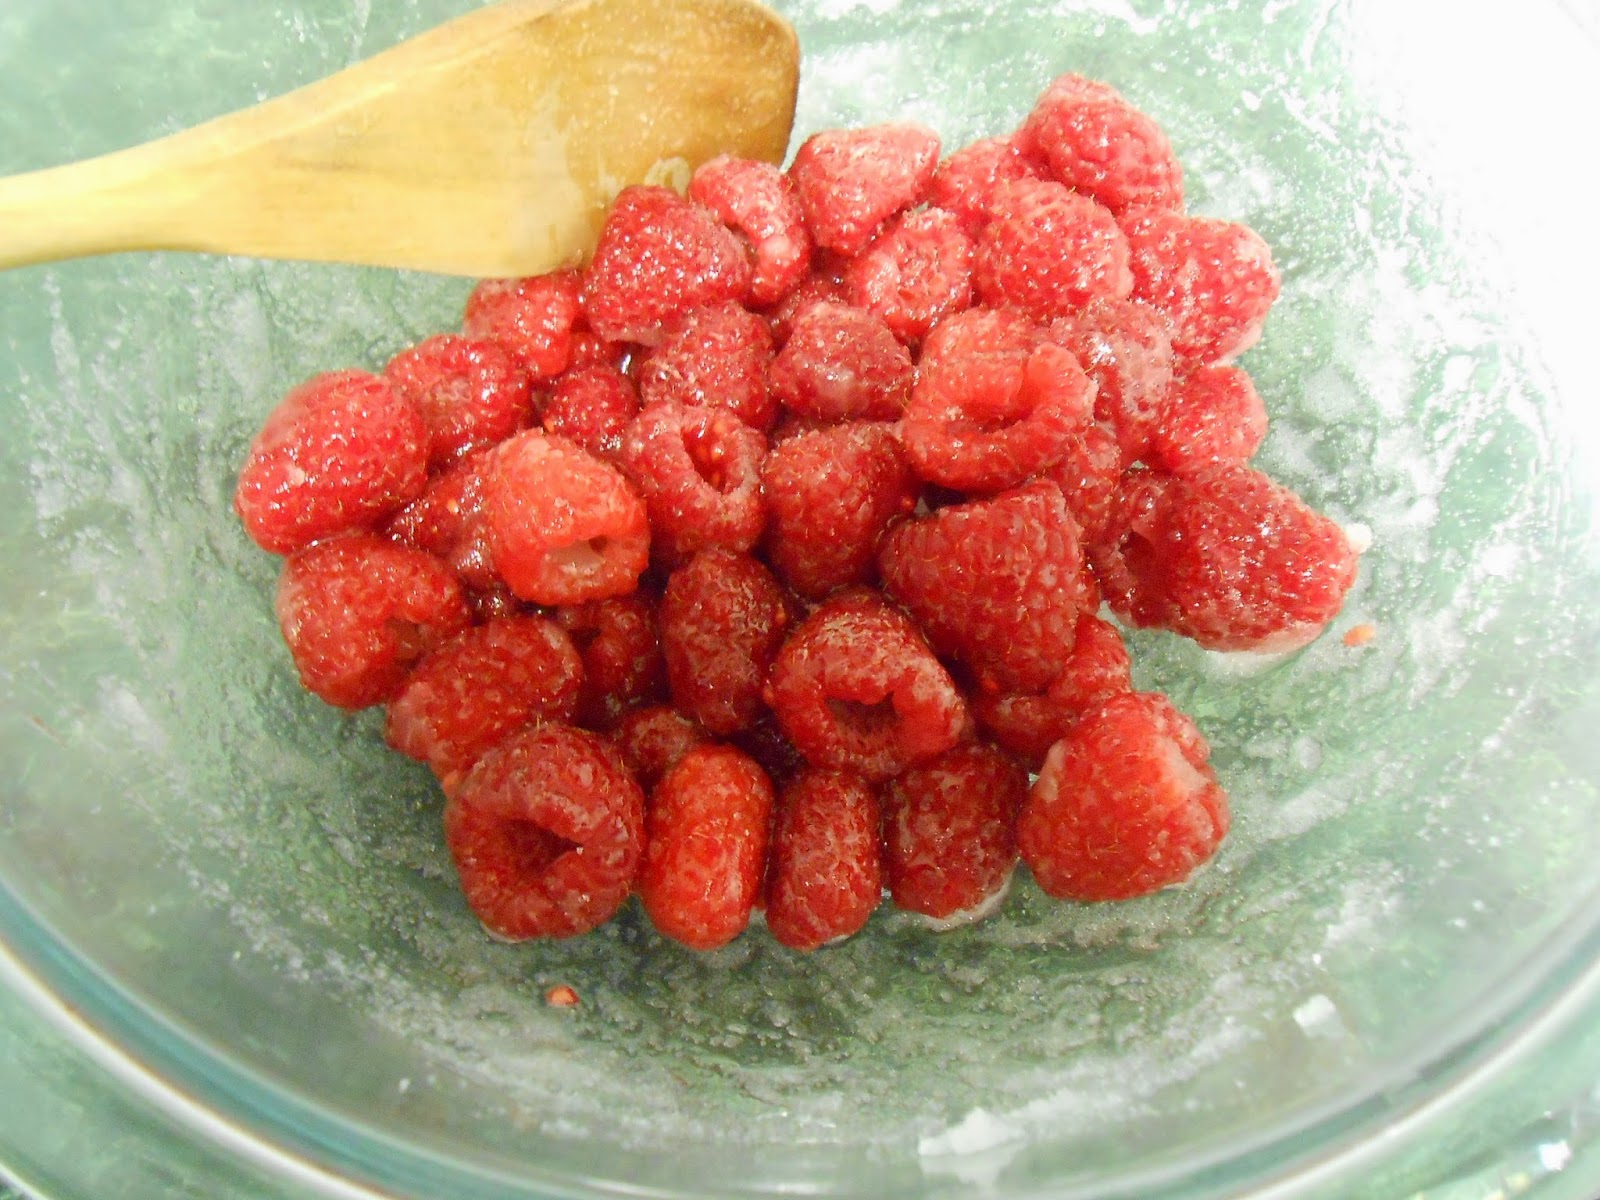
Raspberry Tarts
I don't know about other people, but generally when I think "tart," I think of something small more often than I think of a normal, nine-inch dessert. These are even smaller than what I usually think, more like tartlets, and are perfectly bite sized...which makes them a little dangerous to have in easy snacking reach. These could be made with any berry that's in season. As summer starts to turn to fall, you may find that the berries available in your grocery store are looking a little past their prime. If this is the case, try the recipe with frozen, thawed fruit -- just be sure to drain them before adding the sugar or you'll end up with syrup at the bottom of the bowl.
Raspberry Tart Recipe

Prep time: 10 minutes
Cook time: 20 minutes
Total time: 30 minutes
Yield: 2 dozen tartlets
Ingredients
Raspberry Tart Recipe
Prep time: 10 minutes
Cook time: 20 minutes
Total time: 30 minutes
Yield: 2 dozen tartlets
Ingredients
- Shortcrust Pastry
- 2 cups raspberries
- 1/4 cup sugar
Directions
- Preheat oven to 400° F.
- Roll out the shortcrust pastry and use a cookie cutter or the top of a glass to make twenty-four 2-inch circles.
- Press the circles into greased mini muffin tins, patting any folds into a smoother cup shape.

- Toss together the berries and the sugar, then spoon into the crusts.
- Bake for 20 minutes, or until crusts are golden brown and berries are boiling.
- Remove from the oven and let the tarts cool enough that they are no longer spitting boiling berry juice at you.

- Use a knife to loosen the crusts from the tins and place on a cooling rack to cool completely.
- If desired, top with a small dollop of whipped cream.
Shortcrust Pastry
Puff pastry is good for pies and turnovers, but when I make tarts I don't want them to puff up and throw filling everywhere. Instead I use shortcrust pastry. This crust also works for the pies and turnovers and other things when you don't want to wait for the dough to chill overnight. When using this crust for sweet, fruit-filled tarts I add some sugar to the recipe.
Shortcrust Pastry Recipe
Prep time: 20 minutes
Total time: 20 minutes
Yield: One crust
Ingredients
Shortcrust Pastry Recipe
Prep time: 20 minutes
Total time: 20 minutes
Yield: One crust
Ingredients
- 3/4 cup whole wheat flour
- 3/4 cup all-purpose flour
- (For sweet recipes only) 1 tbsp sugar
- 1/4 cup vegetable oil
- Cold water
Directions
- In a bowl, whisk together all of the dry ingredients.
- Add the oil, then carefully work it into the dough to form a mixture the consistency of breadcrumbs.

- Add cold water, a tablespoon at a time, until the dough comes together but isn't sticky.

- Roll the dough out for whatever recipe you are making.
31 August, 2014
Stone Fruit Compote
This recipe isn't technically a Redwall recipe, since it was never mentioned in the series. In fact, nectarines weren't mentioned a single time and peaches were only mentioned twice in all twenty-two books. Plums and damsons, of course, were mentioned almost constantly. Anyway, this recipe seems so Redwallesque that I felt the need to make it.
I left the skins on my fruit to keep it feeling rustic, but if you prefer you can score your fruit, blanch it (boil for 30 seconds, then submerge in ice water), and peel it before beginning the recipe.
Stone Fruit Compote

Prep time: 10 minutes
Cook time: 10 minutes
Total time: 20 minutes
Yield: 1 cup
Ingredients
I left the skins on my fruit to keep it feeling rustic, but if you prefer you can score your fruit, blanch it (boil for 30 seconds, then submerge in ice water), and peel it before beginning the recipe.
Stone Fruit Compote
Prep time: 10 minutes
Cook time: 10 minutes
Total time: 20 minutes
Yield: 1 cup
Ingredients
- 2 cups chopped stone fruit (I used equal parts of peaches, satsuma plums ((the ones with purple flesh)), and nectarines that I had chopped and frozen previously -- about 1 plum, 1/2 peach, and 1/2 nectarine -- but use your preferred mix)
- 1 tsp honey
- 2 solid shakes of ground cinnamon
Directions
- Throw all the ingredients into a small saucepan and put over medium-high heat.

- Cook fruit, stirring constantly, for about 10 minutes, or until fruit is soft. You'll notice that my plums pretty much broke down into juice that covered the other fruit chunks.

- Spoon compote into a jar and refrigerate until ready to eat or eat warm immediately after cooking.
23 August, 2014
Strawberry Cordial
Strawberry cordial is one of those recipes which is mentioned in basically every book in the Redwall series. Cordial, technically, contains alcohol. I would say that this should be an alcohol-free recipe because children in the series drink it regularly, but the high rate of alcoholism in the series makes me wonder if the dibbuns are actually drinking alcohol. Still, I decided to make this recipe non-alcoholic. I also didn't make it too sweet so it can be enjoyed straight (without mix-ins), but it is sweet enough that you probably don't want to drink too much at once. If you want to change that, just add a splash of vodka before drinking. I made a fairly small batch, but this would be easy to scale up.
PLEASE NOTE: Yet again, this is a recipe which needs to be started the day before you want it. Be prepared.
Strawberry Cordial

Prep time: 15 minutes
Cool time: 24 hours
Total time: 24 hours, 15 minutes
Yield: 24 ounces (Three glasses)
Ingredients
PLEASE NOTE: Yet again, this is a recipe which needs to be started the day before you want it. Be prepared.
Strawberry Cordial
Prep time: 15 minutes
Cool time: 24 hours
Total time: 24 hours, 15 minutes
Yield: 24 ounces (Three glasses)
Ingredients
- 24 ounces water
- 1/3 cup sugar
- 2 cups strawberries (I used frozen, thawed strawberries that I bought and froze at the peak of strawberry season) (I have also successfully tried this with raspberries, but ot have not yet tried any other fruit)
Directions
- Place fresh or thawed strawberries into a large, heat-proof bowl.
- Combine water and sugar in a saucepan.
- Heat water to a low boil, stirring to dissolve sugar.
- Pour hot water over strawberries and allow to sit until cooled to room temperature (about 90 minutes).

- Cover bowl with plastic wrap and refrigerate for the rest of the 24 hour cool time.
- Remove bowl from refrigerator and use a slotted spoon to remove the strawberries (Keep these -- they are great smushed onto toast or added to a smoothie). The water should now be a bright, jewel red.

- Use a ladle to pour liquid into glasses or funnel into bottles for later.
16 August, 2014
Blackberry Pudding
I feel like I should start this post with an explanation of the word "pudding." Here in the US, "pudding" refers to a specific dessert that's like a thick custard, generally milk-based and thickened with cornstarch, eggs, or gelatin. In the UK, "pudding" can be used just to refer to desserts in general. It also can mean specifically a bread pudding, often steamed, such as your traditional Christmas-time plum pudding. For the most part, I believe Brian Jacques (who was English) was referring to these bread puddings when he used the word. I will follow this idea for the most part, except for a few recipes I think sound like they would be better as the American, custardy "pudding."
This blackberry pudding (really a mixed berry pudding here because I worried just blackberries would be a little boring. And a little expensive) was mentioned in the book Taggerung. I made a small one, suitable for about four people, but it would be easily scaled up to a bowl twice the size of what I used.
PLEASE NOTE: This is another recipe which needs to be started the day before you wish to serve it. Also, this recipe works best with bread which has been left out for a few hours to grow stale, as though you were making French toast, but fresh bread will work as well.
Blackberry Pudding

Prep time: 15 minutes
Rest time: 18 hours
Total time: 18 hours, 15 minutes.
Yield: 4 servings (One one-quart pudding)
Ingredients
This blackberry pudding (really a mixed berry pudding here because I worried just blackberries would be a little boring. And a little expensive) was mentioned in the book Taggerung. I made a small one, suitable for about four people, but it would be easily scaled up to a bowl twice the size of what I used.
PLEASE NOTE: This is another recipe which needs to be started the day before you wish to serve it. Also, this recipe works best with bread which has been left out for a few hours to grow stale, as though you were making French toast, but fresh bread will work as well.
Blackberry Pudding
Prep time: 15 minutes
Rest time: 18 hours
Total time: 18 hours, 15 minutes.
Yield: 4 servings (One one-quart pudding)
Ingredients
- Sliced bread (I used about ten slices of a low-calorie, whole-wheat bread)
- 5 cups mixed berries (I used blackberries, raspberries, blueberries, and strawberries)
- 1/4 cup sugar
- 2 tbsp water
Directions
- Cut the crusts off several slices of bread and use them to line the bottom and sides of a sturdy, one-quart bowl. Overlap the slices so you have as close to a gapless layer as possible.

- Use a knife to cut off the bread at the lip of the bowl.

- Place the berries, sugar, and water into a saucepan and heat over medium heat until the berries become soft and begin to release their juices.

- Using a slotted spoon, spoon the berries into the bread bowl.
- Carefully pour the released juices over the berries.

- Cover the berries with more slices of crustless bread, again trimming any that hangs over.

- Place a plate or similar cover on top of the pudding and weigh it down with a can of beans or something similar.

- Refrigerate for about 12-18 hours.
- If necessary, use a butter knife to loosen the bread from the sides of the bowl, then invert the pudding onto a plate (or the cover of a tupperware if you're planning to transport it).

- Slice and serve the pudding, with a garnish of whipped cream, if desired.
If you happen to have extra juice at the end of step four, I highly recommend dipping your discarded bread crusts into it and eating them on the spot. :)
09 August, 2014
Strawberry Jam Turnovers
These turnovers were mentioned in Salamandastron. I made them small biscuits with homemade jam and puff pastry dough. They would be great to put on a saucer with your cup of tea if you're feeling fancy. Some unfortunate oven problems prevented my puff pastry dough from puffing properly, but they still tasted quite good. These are not very sweet, so if you want a more cookie-like treat you can dust them with powdered sugar after baking or sprinkle with granulated sugar before baking.
Please remember, if you're making your own puff pastry dough you should start it the day before.
Strawberry Jam Turnovers

Prep time: (Not including making the dough, if you're doing that) 30 minutes
Cook time: 10-15 minutes
Total time: 40-45 minutes
Yield: 3 to 4 dozen micro-turnovers
Ingredients
Please remember, if you're making your own puff pastry dough you should start it the day before.
Strawberry Jam Turnovers
Prep time: (Not including making the dough, if you're doing that) 30 minutes
Cook time: 10-15 minutes
Total time: 40-45 minutes
Yield: 3 to 4 dozen micro-turnovers
Ingredients
- 1 recipe puff pastry dough
- About 1/2 cup your choice of jam (I used my Basic Strawberry Jam)
Directions
- Preheat oven to 425 degrees Fahrenheit.
- Take your dough from the fridge and turn it onto a lightly floured surface. Using a lightly floured rolling pin, roll it out to about 1/8 of an inch thick.
- Cut the dough into 2.5 inch rounds or squares (I used the rim of a wine glass to make circles because I don't have any cookie cutters...that aren't Star Wars shaped...)
- Cover a baking sheet with parchment paper and transfer your dough pieces. Place about a 1/2 teaspoon of jam in the center of each piece.

- Fold the dough over to make a half-moon or triangle, covering the jam.
- Use a fork to crimp and seal the edges of each turnover. (You can tell I overfilled some of these and they leaked during the crimping. Use a paper towel to wipe the worst of the leak so you don't end up with burned jam at the edges.)

- Place the baking sheet into the oven and bake for 10-15 minutes, or until golden brown.
- Slide the parchment paper with the turnovers onto racks to cool before storing in a sealed tupperware.
08 August, 2014
Basic Puff Pastry Dough
Puff pastry dough is a basic necessity when making certain baked foods such as turnovers or pies. It also can be baked alone as biscuits or croissants. If you like, you can of course buy frozen puff pastry but that's no fun and you can't control what's in it. Traditional puff pastry has a 1:1 ratio of flour to butter, which is a little horrifying to me. I lessened the butter down to the bare minimum needed to get flaky layers and a rich, buttery taste.
PLEASE NOTE: This recipe is best made the night before so it can rest in the fridge overnight. I've been told that puff pastry can rest just a few hours in a pinch, but I've never tried it and can't personally vouch for the results.
Basic Puff Pastry Dough
Prep time: 1 hour (this is a high estimate; the temperature of your kitchen will matter a lot)
Rest time: 24 hours
Total time: 25 hours
Yield: Enough dough to make two pie crusts (such as for two single crust pies or one double crust pie)
Ingredients
- 1 cup all-purpose flour
- 1 cup whole-wheat flour
- 1 stick cold butter, diced
- 1 cup ice water
Directions
- Whisk the flours together in a large bowl.
- Using a pastry cutter or two knives, cut the butter into the flour until you have pea-sized chunks throughout the flour.

- Slowly add ice water to the flour a little at a time, using the pastry cutter to work it in. Start with half a cup, then add a tablespoon at a time until the dough just barely holds together. Go slowly for this step. The amount of water you need will vary depending on your flour brand, method of storage, location, the current humidity, whether or not it's actively raining, and what house Jupiter is in.

- Turn the dough onto a lightly floured surface and use a floured rolling pin to roll it into a rough rectangular shape.

- Fold the rectangle into thirds and turn so the seam is vertical to your point of view.

- Repeat steps four and five three more times (so you roll the dough out four times total). As you roll, you will notice the dough becoming smoother as it begins to hold together more.
- Fold the dough into sixths, wrap in plastic wrap, and refrigerate for twenty-four hours.

- The next day, take the dough from the fridge and roll out as needed for your recipe.
Important note: It's important to keep the dough cold throughout this process. If you can smell butter your dough is getting too warm and the butter is melting. Put it back in the fridge for a few minutes before continuing to work with it.
02 August, 2014
Strawberry Jam
Strawberries were on a huge sale this week at my local grocery store, so I bought a lot and froze most of them. I recommend doing this with your summer berries and stone fruit if you want to be able to enjoy them outside of the summer season. Frozen fruit will keep for several months if properly frozen and stored, so you can enjoy it deep into the winter. Strawberries just need to be washed, hulled, and frozen in a single layer on a cookie sheet before being dumped into a freezer bag (no sugar or syrup required). Anyway, on to the recipe.
Strawberry jam is mentioned numerous times in the Redwall series, often accompanied by something or topping something. This week, I'm just going to explain the jam itself. I'll get to the accompaniments later.
My big sticking point when deciding on this recipe was that it could not contain synthetic pectin. Added pectin is not something Redwallers would have had to cook with; they just would have used natural ingredients. After scouring many recipes, I finally coalesced several ideas into a single recipe I liked. The downside of making jam without adding pectin is that it tends to be slightly runnier than other jams. The upside is that you barely have to add any sugar, since the pectin isn't there to dull the flavors of the berries.
Another quick point: I don't have canning supplies, so I made a small batch. I'm sure this could be scaled up to more usual jam proportions, but PLEASE don't try that unless you have all the proper canning equipment and knowledge. Just pouring jam into a can, closing it, and expecting it to last in the pantry for years can lead to serious diseases. This small batch will last for approximately three weeks in the fridge.
Basic Strawberry Jam
Prep time: 5 minutes
Cook time: 20 minutes
Total time: 25 minutes
Yield: Between 1 and 2 cups of jam (I got just about a cup and a half, but it depends on how much your strawberries cook down)
Ingredients
- 1 pound of strawberries
- 1 lemon
- 2 teaspoons honey
Directions
- Wash the strawberries, pulling out any stems, loose leaves, or rotting fruit.
- Cut the leaves off the strawberries and discard, then cut the fruit into chunks, such as quarters.

- Place the fruit and honey into a saucepan and use a potato masher or something similar to mash the fruit slightly and mix in the honey.

- Cut off about a third of the lemon and squeeze the juice into the mashed berries, then drop in the rind as well.
- Place the saucepan over medium heat and bring to a boil, stirring. The berries will begin to soften, then break down completely.

- Keep the strawberries at that boil (still stirring) for about fifteen minutes. They are done when you can swipe your finger along your stirring spoon and leave a clear trail.

- Fish out the lemon rind and pour your jam into a container. Cool and store in the fridge for up to three weeks.
While "Redwall Strawberry Jam" would just be the fruit and honey, strawberry jam lends itself very nicely to other flavors. Feel free to experiment by adding at the beginning things like vanilla paste (or extract, or a bean that you fish out with the lemon rind), balsamic vinegar, red wine, black pepper, basil, mint, or rosemary.
26 July, 2014
Salutations!
Hello, dear (as of yet non-existent) readers. Welcome to my blog, where I hope to cook my way through Brian Jacques' Redwall series. I finally have settled into my new apartment and now that I have a proper kitchen and cooking utensils (horray!) I'm ready to get started. I think, therefore, I should explain a few of my quirks and idiosyncrasies before I start making and posting recipes.
1. I am determined to not use eggs. In The Rogue Crew, the character Uggo Wiltud clearly tells a group of vermin, "An' we don't eat birds, or their eggs, or any livin' creature-er, 'cept watershrimp for otters' hotroot soup." Never mind that part in Redwall where "eggs were taken from a squirrel's ear" or when Basil Stag Hare declared, "...I want a decent brunch: half a dozen boiled eggs... " Thoughout the rest of the series, Redwallers don't eat eggs, so I will do my best to avoid them. This, therefore, should make my recipes easy to veganize, just use your favorite vegan substitutes whenever a recipe calls for milk or butter.
2. I'm going to attempt to make things healthy...ish I'm not Paula Dean. There will be no "pound of butter" in my ingredients list and I will probably be using less sugar than you would normally see in most recipes. There will be some sugar, though, because I don't go to the extremes of making everything sugar-free and I refuse to use artificial sweeteners. I also will do things like mixing equal parts of whole wheat flour with unbleached all-purpose flour to add some fiber. Feel free to ignore these changes if you wish.
3. I don't add salt to anything. Unless I'm trying to dehydrate something I don't add salt. I have followed a salt free diet as much as possible for so long that I now really dislike the taste. For savory dishes, particularly soups and stews, it's very likely you will want to add salt to suit your tastes.
4. I'm going to try to cook "Redwall Style." With additional notes. What I mean by this is that I'm going to try to make things the way Redwallers would. No artificial ingredients, no added spices they probably wouldn't have (rosemary and cinnamon yes, saffron and Chinese star anise no). I'm also not going to use flavor combinations which seem unlikely in that world, even if all the ingredients are there (no rosemary apple pies). I will, however, add notes to the ends of recipes with suggestions of "modern," human tweaks, substitutions, or additions which could be made.
Now that I've gotten past the need-to-knows, I guess I can explain a little bit about how this blog came to be. I started reading the Redwall series when I was in fourth grade (which seems to be about when most people start it). I only read about half of the books back then, but the thing that stood out the most to me was the food. So much detail was put into describing the food found at every lavish feast, every quick snack, every traveling bag. I was constantly hungry while reading the stories. More recently, at the end of my undergraduate years, I re-read the entire series (all twenty-two books) and took notes throughout about the food mentioned and described. I decided that when I finally had a place of my own I was going to start trying to bring those ideas to life. Thus, this blog came in to being. I hope to make a lot of great recipes and I hope at some point other fans join me on the journey. Until then, at least I'll have something to munch on while I read.
27 April, 2014
Test Post
This is a test post to check the design of the blog and make sure the top tabs are working. Once I have recipes started, this will be the breakdown of the tabs:
Breads and Scones: Bread, Scones, Biscuits, Wafers, Dumplings, and Muffins
Pasties and Flans: Pasties and Turnovers (Sweet and Savory), Flans (Sweet and Savory), Bakes (also known as Casseroles and Hotpots)
Soups and Stews: Soups, Stews. Duh.
Cakes and Pies: Cakes, Pies, Tarts, Crumbles, and Slices
Puddings and Trifles: Puddings, Trifles. Duh again.
Toppings: Preserves, Icings, Dips, Sauces, and Garnishes (like candied rose petals)
Other: Fish, Oatmeal and Porridge, Fruits, Vegetables, and Nuts, Drinks, and Other (Things like "sausages" and the Throppletwist. I will try to think of a better category than Other: Other).
To test that the tabs actually work, here is a recipe for water, which should be found under the Other tab due to its category of Other: Drinks.
Water
Prep time: 1 minute
Cook time: 0 minutes
Total time: 1 minutes
Yield: 1 glass of water
Ingredients
- 1 cup water (filtered if desired)
- Pour water into a glass.
- Drink.
Subscribe to:
Posts (Atom)